“Creativity Is Allowing Yourself To Make Mistakes. Art Is Knowing Which Ones To Keep.” ~ Scott Adams
I've always wanted a jacket with leather sleeves. So of course NIFTY THRIFTY found a way to make that happen.
Last weekend, I hit the ground running and went thrifting in Memphis. I snagged two blazers (among other items) at Goodwill for $4.99 a piece which means this jacket cost a grand total of $9.00!
Usually, I wouldn't share my DIY project secrets (obvious lie hence this blog) but I love you, loyal viewer!
I'll walk you through this DIY step by step... Just Click Below
Learning from my previous post, I decided to take pictures before I becoming scissor happy....
| THRIFT TIP: When thrifting for DIY projects, I always thrift 1-2 sizes bigger than my actual size. It's easier to go smaller with bigger clothing because you have more "wiggle room" to make mistakes. This is very necessary for a beginner sewer like myself. | 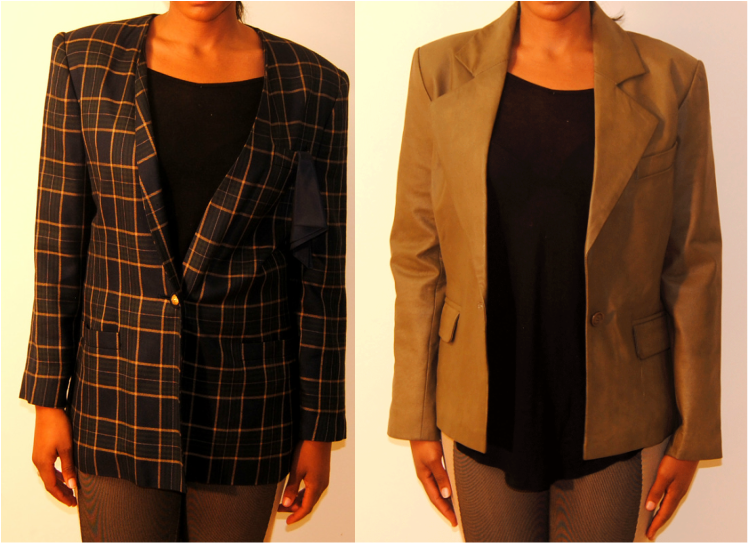 Original Plaid Blazer // Original Leather Jacket |
What You'll Need
- Shear Scissor
- Pins
- Sewing Machine or Needle and Thread
STEP 1: CHOOSE YOUR BLAZERS & DECIDE YOUR COMBINATION
I fell in love with the plaid blazer first. I found the complimentary leather shortly after.
The plaid blazer is technically a male blazer and the leather is for women's. Whether it is two women's blazers, two male blazers or a combination of the two, they can still be combined.
STEP 2: PICK UP THOSE SCISSORS
After I decided to make the plaid the base and use the leather sleeves for the embellishments, I started cutting.
Remove the sleeves at the hem.
*Please Note: If these two blazers fit me perfectly, I would have cut either above or below the hem to make it easier to sew the pieces together. However, for my project, these blazers were bigger so I didn't need the extra fabric for sewing.
STEP 3: START PINNING
Since I was working with a larger blazer, I had to take the sides in about half an inch on both sides. The front pockets made this process a bit difficult. Therefore, I had to take it in on the back panel rather then the side panel.
I did the same for the sleeves, pinning it to be slightly fitted to my arms.
Blazers typically have a polyester lining. Leave the lining attached when sewing pinning. It will result in a polished finish.
STEP 4: GRAB THE SEWING MATERIAL
When sewing, you will need to sew along the pin lines.Make sure that you are sewing with the wrong size facing outwards (see above slideshow) and to make adjustments to each piece individually (base and sleeves) before attaching the sleeves to the vest. Before attaching the sleeves, try on the sleeves and garment separately to make sure they fit to your liking.
Now you can move onto the final phase of attaching the sleeves. It's important to make sure that the arm holes of the sleeve and the arm holes on the vest (base of the coat) have the same size circumference. If done correctly, you'll be able to sew the two together with ease.
Again, sewing with the sleeves with the lining facing outwards and the vest outwards, start sewing the arm hole to the vest.
STEP 5: TRY IT ON. ADJUST OR WEAR
Now it's time to try it on and see what you've made. If it doesn't fit to your liking, revisit steps 2-4.
When I tried on the jacket, it fit perfectly. However, I liked the sleeves cuffed or scrunched up
STEP 6: Enjoy!!
After step 5, you're ready to go. ENJOY
XOXO
Nifty Thrifty
Nifty Thrifty
PS. Please send in your DIY UPCYCLED BLAZER fab pictures to [email protected] for a chance to be featured on The Color Tag as a Thrifter Not-So Anonymous

 RSS Feed